If you wish to order one of my Blurb Books

If you wish to order one or more of my Blurb Books click on the link below

http://www.blurb.com/user/store/misto?filter=bookstore

The above link will then take you to my bookstore.

Tuesday, August 25, 2009

Roses on a Blanket

THAT SOFT LOOK

My husband was sick so I decided to drop by a florist's shop and check in on their flowers. It was towards the end of a Friday afternoon and the above roses were $1.00 each. Boy did I have fun photographing roses that weekend!

The above roses are resting on a creamy colored blanket.

The only thing I did on this image was to smudge everything and clone a few places.

When I was entering competition this never won any awards, but this image got my highest score in 4 state competition - it got a score of 91.


Challenge for today:

Bring out the beauty in flowers in a simple setting.

Sunday, August 23, 2009

Mosaic Vase


COLORFUL MOSAIC GLASSWARE

Mosaic glassware is beautiful with light shining upon it....however......it pretty well has to be empty in order to get the best advantage of light bouncing off of it. I have photograph the above vase many times, but most of the time I have flowers in it.

Anyway, back to the photo. The background I used for this image is the same I used for the image I posted on August 18.

For the flowers I used a couple of roses which were past their prime and placed them in front of the vase.

After I photographed the image and got it into the computer I placed a textured image I had created and placed it as a layer upon the image I had just photographed. Because I only wanted the final result to look a little like a painting, I adjusted the opacity of the textured layer so that only a bit of it was showing up on the original photograph.


Challenge for today:

Remember you can still photograph flowers which are past their prime. Try it.

Saturday, August 22, 2009

Tulips and Glassware

HAVING FUN IN YOUR CREATIVITY!

This may not look too creative, but for me having the glass plate in an upright position in front of a glass jar is being creative.

For me this was just a fun photo shoot experimenting with clear glass and tulips/daffodils. I actually have quite a few versions of all of this and I'll be sharing at least one more version further on.

Anyway, the background in the original image was white poster board.

After I got the image into the computer I took a textured image I had created which is just made up of colors. I then darkened it quite a bit before I placed it as a layer on the image I had just photographed. Then after quite a bit of mixing and erasing and adding back onto the original image, I got the above look.

It looks kinda wild and modern and I like the final result.


Challenge for today:

Experiment with positioning glassware in unusual positions.

Friday, August 21, 2009

Roses in a Cookie Jar

USING UNUSUAL ITEMS

The one thing about looking at magazines - you gain new ideas. However using a cookie jar was entirely of my own thinking.

Now actually this isn't a very good picture - the roses look too pale. Yet, I like the image because I used an antique cookie jar AND the background is one of my own images printed out to a size 12" by 18" in length.

Nothing special was done to the image except smudging the foreground material a bit.

Challenge for today:

Once again, try your hand at printing out and use one of your own images as the background.

Thursday, August 20, 2009

Morning Glories and Other Flowers

LETTING THE MATERIAL GUIDE THE PHOTO SHOOT!

I had a soft, pastel colored night gown. I love it; however when you start using clothes as a part of the background/foreground, you generally are limited on how much material you actually have to use in the picture.

Anyway, I was willing to take the risk and I helped minimize my photography problem by using the material only in the foreground and I used white poster board for the background.

I'm not a floral arranger and the flowers in the vase proves it, but I do like the way the morning glories are arranged on the material. (Remember, morning glories tear easily and they are called morning glories for a reason.)

After I got the shot I wanted and downloaded the image into the computer, I got out a textured image I had created and placed that as a layer. With such light colors on the background/foreground it was easy to adjust the opacity of the layer and get just enough of a "painting" look.


Challenge for today:

Start thinking about photographing some morning glories - the blossoms are large and they can fill up a lot of space in an image.

Wednesday, August 19, 2009

Hollyhocks and Peppermint

HOLLYHOCKS AREN'T FUN TO ARRANGE!

I love it when flowers have large blossoms because they take up a lot of space.....And to be able to photograph flowers which seem SO much a part of the past - WOW!!!!

BUT.......hollyhocks DO have major photographing problems.

1. The flower stems are extremely tall - some over 6 feet!
2. Their seed pods makes the stems top heavy which causes the stem to twirl around and difficult to arrange in a vase.
3. When you are in the flower garden you pretty much have to decide which stem to cut into. A stem may have over 25 unopened buds on it, 3 blossoms in full bloom, 1 blossom starting to open, and 7 seed pods. And everything seems to be randomly placed on the stem. You might have 1 full blossom 5 inches down from the top of the stem.....then another flower in full bloom 7 inches further down........
4. And hollyhocks are biannual.

Now back to the above image.

I chose a few stems which had blossoms close to the top. Because the blooms were toward the top, I was able to leave most of the stem still intact with the plant for further blooming.

I then picked some fresh peppermint to add a different color to the picture and to add more foliage to the image.

I chose cream color material for the foreground and background because I knew I was going to add a light colored textured background later with the computer.

After I shot the picture I wanted, I downloaded it into the computer and placed a textured layer over the hollyhock image. I adjusted the opacity and then I went into Photoshop Elements 3 and used the pastel filter. Because I wanted to offset the brightness of the pastel image, I went back and made a layer of the pastel filter and placed it over the combined textured layer/hollyhock image and then adjusted the pastel image's opacity.


Challenge for today:

Hurry up and plant those hollyhock seeds. You still might be able to get some blooms next year. But you have to hurry now!!!!!!

Tuesday, August 18, 2009

Oranges and Flowers

GET SOME FRUIT INTO THE PICTURE!

Many paintings use the combination of fruit and flowers and you can too. If you don't have any in your yard, next time you go to the store just purchase several oranges, apples, etc. Of course you should know ahead of time how you will use the fruit in your photo shoot.

In order to minimize the cost of purchasing fresh produce, it helps when you plan on using a small vase. A small vase means you don't have to have a lot of space to fill up with flowers and fruits/vegetables.

Now on to the above image. The vase I used in the image wasn't too much bigger in height than the oranges I used.

For the background material, I used my favorite all around Wal-Mart purchased material. It is VERY WIDE and I have at least 3 yards of it. This gives me a lot of moving around room. One thing I love about about this material is the coloring. It has different shades of brown, yellow, red, etc., in it.

One of the hard things about still life images is trying to make everything seem like it ISN'T a still life and trying to keep it from being boring. Somehow peeling one of the oranges and leaving what I peeled on the table beside the orange makes it seem more realistic and not boring.


Challenge for today:

Check out the fruits and vegetables available and try your hand at combining them into an image with flowers.

Monday, August 17, 2009

Pretty Petals

LOOKING AT PETALS!

I fell in love with these flowers, though I'm not quite sure what they are. There is something about the petals which excite me!

I placed the flowers and some ground cover in a small vase.

For the background I used white poster board because I knew I wanted to add a textured background. White would not compete against the colors of the background I was going to add later.

After I got the image I wanted into my computer I added the textured background and adjusted the opacity of the textured layer.

I then combined the added textured layer to the original image and then saved everything as a different image.

As a finishing touch I softened the image a bit.


Challenge for today:

Take a close look at those flower petals.

Sunday, August 16, 2009

Morning Glories


GETTING CLOSE TO THE FLOWERS!

Morning glories are beautiful, but you DO have to get to them early in the morning for they close when it gets pretty sunny outside and they do close on you after a while inside. Also be careful in picking them because their petals are very delicate and tear easily!

For this image I picked a few and placed them in a simple vase. The background I used was white poster board. I knew I was going to place a textured background as a layer on top of the photograph so I went ahead and made everything simple by using white as the background.

After I took the photo and chose which one I wanted to use, I got the image into the computer and pasted a textured layer on top of the original photograph. I then adjusted the opacity of the textured layer.

Then when I was pleased with the way the image looked, I softened the combined image/layer and "softened" it.


Challenge for tomorrow:

See if you can find some morning glories or some wild morning glories to photograph.

Saturday, August 15, 2009

Gentle Flower


SOFT AND SIMPLE!

I had a surprise show up in my garden - a single gladiola. I had planted it the year before and though it came up......it never bloomed. I know you are supposed to dig up those bulbs, but I've never done so. Well anyway....I sure was surprised to see the thing up and blooming the year after I planted it.

Now back to the photo. I had a medium sized nightgown which had soft colors on it. So I decided to try and use the nightgown as the material for this shoot. Since I didn't have a lot of material to work with, I had trouble hanging and draping the material. And the material had seams in it and it had a front and a back as clothes do have. So it WAS difficult to work with.

With such a shortage of material, I had to use a small vase which worked out fine since I didn't have too much of a flower to work with. (The gladiola was just about gone before I knew I had a blossom out in my garden.)

Though I really do hate the way the top part of the material drapes down, I really do like the way it ends up curving around the vase and on out to the edge of the image.

Though I did smudge the vase because it actually had a green line and small pink flowers on it, I didn't smudge anything else in the picture. I didn't want to destroy the curve of the material.


Challenge for today:

Check your flower garden again to see if something interesting has started blooming.

Friday, August 14, 2009

The Fog


LOOKING OUT FOR THE FOG!

I had gone on a camping trip and had gotten up before dawn because I wanted to get a photo of colors of the sun rising. The above image was taken as I looked down at a river as the sun was rising. There was some fog in the area, but I sure was surprised when I got the image back from processing and I had the fog as a golden color. I scanned the negative into my computer AND the color was golden. The processing center had not adjusted the color.

The only thing I did with the above image was to clone out a couple of areas in the foreground.


Challenge for today:

Capture some of the dawns and sunsets in your area.

Thursday, August 13, 2009

The Cat


Sometimes You Cannot Create the Pose!

Sometimes you get poses which you cannot create, but you CAN kinda push it along.

My cat was on a table and I just put the bowl in front of her.

I then did a special effect in some software.

But the main thing is the cat looking down at an empty bowl.


Challenge for today:

Look around for possible photos with your pets.

Wednesday, August 12, 2009

The Pathway


NOTICE THE GENTLE PATHWAYS IN YOUR LIFE!

I took this picture about 10 years ago and it is gentle enough that I like it.

This image is the result of going into some software and letting the software do a special effect. That is all that I remember about this picture's history. I'm sorry, but at least you can enjoy a little bit of the calm of nature.


Challenge for today:

Take a walk and photograph the trees.

Tuesday, August 11, 2009

Spring in the City


USING TWO VASES!

I wanted to utilize 2 antique vases. They are called "Gufus Glassware." (I'm not sure if Gufus is the right spelling....) Anyway, the glassware is painted in the inside of the vase. So, a lot of this kind of antique glassware has the paint coming off from the inside of the vase.

Now back to the actual photo. I placed the two vases close enough together so it looks like all of the flowers are in one vase; however, I placed the vases enough at an angle that you can clearly see the flower design on each one of the vases.

I used a really dark lavender material for the background. Then I placed some yellow material on a table to be a part of the foreground.

After I shot the photo I went added a texture image and placed it as a layer onto the photo I had just taken. I then adjusted the opacity enough to give the final image some extra interesting color/texture.


Challenge for Today:

Try and photograph two vases together.

Saturday, August 8, 2009

Purple Coneflower


MERGING OF TWO IMAGES

Photographers have had fun for years merging photos together. The above image is what I merged by using the computer.

I took a photo I had taken of a purple coneflower on a small blue dish. I then took a photograph I had taken of an outside light by my front door.

And I just combined the two images together!


Challenge for today:

Again, I think I am well protected from a computer crash. As far as I know everything I've ever done I have on both DVD's and portable hard drives. Are you as well protected?????

Friday, August 7, 2009

Cosmos and Zinnias


CHOOSING PLEASING COLORS!

Forgive me for such a long time between posts. I never knew that a thunderstorm can create problems for your computer even though your computer is unplugged AND the lightning is just only too close for comfort.

Now that I'm back in business, I'll start with the above image.

I chose orange and yellow and a touch of lavender because the colors go so well together.

The pot is only about 4 inches high - so you see the entire image fits quite closely together.

After I shot the image I got it into my computer and made a layer out of one of my textured images and started adjusting the opacity of the textured layer. I only wanted enough of the textured image to show to give the final image an overall idea of being a painting.


Challenge for today:

Make sure you have adequate backup for all the images you have placed into your computer and make sure you keep the backup in a safe place!

Monday, July 20, 2009

Anniversary Roses by Candlelight


TRY DIFFERENT VERSIONS OF THE SAME SUBJECT!

The above subject is another attempt at photographing a subject, printing it out as a 12 x 18 inches image, framing it and then using the framed image in another photographic still life. And if you would refer to May 15 you would see a slightly different still life image of the above subject.

But for today's image I used a different vase and a different frame. I also changed the layout of the candle and the dried roses. I also let more of the mantle show in this picture.

There was NOTHING done with this image after it was downloaded into my computer.

Now, which image do you prefer - the image for May 15 or the one for today?


Challenge for today:

Frame one of your own creations and then photograph away.

Sunday, July 19, 2009

Roses and Others


MAKING IT DRAMATIC!

Somehow having a dark background/foreground really helps in making an image dramatic looking.

And you don't HAVE to do anything to an image after it is downloaded into your computer - this image is a perfect example of having nothing special added or deducted.

This image is just about darkness and lightness of subjects and using what you have at the moment.


Challenge for today:

Photograph some images using a very dark background.

Saturday, July 18, 2009

Middle of the Summer Blooms


YOU CAN HAVE FUN WITH PHOTOGRAPHY!

The above image was just plain old fun to do!

I took one of my images and printed it out to be 12" by 18" in size and used it as the background.

I then took a small blue vase which pretty well matched the color of the plate in the background image.

I took some day lilies and zinnias and placed them in the vase. I placed in the foreground a bunch of black eyed susans (which also happens to be the flower in the background image).

Then the photography shooting began and there you pretty well have the completed image.


Challenge for today:

Try and get an image together that you can print out and use as your own background for another image.

Friday, July 17, 2009

Yellow and White


I HAD A GRAY AND WHITE DRESS!

Yes, that's right - the background material is a gray and white dress.

Basically the above image is simple. I placed a few spring flowers in a clear vase and placed a few flower petals and leaves around the vase - then I started the photography session.

After I got the shot I wanted, I downloaded the image into my computer.

I then got out a textured background I had created and pasted it as a layer onto the original flower image. I didn't want to actually cover up the pattern in the dress; I only wanted to add some additional color and drama. In fact you can see some of the white flowers in the dress material.


Challenge for Today:

Use a dress or shirt for the background of some picture.

Thursday, July 16, 2009

Fresh and Old

DON'T BE IN A HURRY TO THROW AWAY THOSE OLD ROSES!

The day before yesterday I posted an image with different arrangements of these same pottery vases.

This picture is about fresh flowers and old roses which seem to go with the brownish colored pottery containers.

However, I don't remember exactly how I did this image.

I know I must have used the see through curtains which have white flowered patterns in them, because I can see a faint outline at the top of this image of those white flowers.

In my computer I must have placed a textured layer on top of the original image to get the "painting look."

But, like I said, I don't really recall HOW i COMPLETED THIS IMAGE.

I'm sorry, but I do hope you'll enjoy the image for itself.


Challenge for today:

Just stop and smell the flowers.

Wednesday, July 15, 2009

Roses and Zinnias


PHOTOGRAPHING YOUR OWN WORK!

Actually there was little done to the actual final image, but there is a lot to tell about the composing of the picture and there IS a story behind the framed picture.

So, first I'll start with the picture in the frame.

I went to a local antique store and bought this tiny hob nail vase for less than $15. I used as the background a sweater which has colored specks on it. Having a sweater as a background limited me on the amount of space I had for photography purposes. After I got the shot I liked, I smudged the sweater a WHOLE LOT. I then added a textured background I had done. I then gave a copy of the image to the antique store owner. She was thrilled!

Now on to the story behind this new image.

First, for me it is HARD to photograph a frame so it ends out looking like it should be - straight.

Secondly, for this picture I wanted to use the same sweater as the background. So to the right of the picture I used clothes pins to hold the sweater into place.

Thirdly, I wanted to use the same hob nail vase. But the light was coming from a different angle so in this picture the vase doesn't look white. You CAN clearly see the lips of the vases are the same and of course you can see the hob nails.

And for the final touch, I wanted to use pink as the color in the foreground flowers. Unfortunately, I was limited on the number of pink zinnias I had on hand - one. And one pink flower doesn't make a majority. But that turned out fine because I had plenty of darker colors. Placing the one pink blossom next to the framed picture keeps the eye coming back to the inside of the image because that is where the lightest colors are.

And that is how I did this photo.


Challenge for today:

Compose one of your own images into the making of another image.

Tuesday, July 14, 2009

Pottery, Flowers and Letters


MIXING THINGS UP A BIT!

I arranged this image because my husband bought me some roses and I couldn't let them go unphotographed.

To help make the rose bouquet larger I decided to pick some daffodils which were blooming.

Since the roses were kinda an orange color, I decided to place the flowers in a pottery vase I had purchased at a garage sale.

I then added some more pottery vases of various sizes which were a flea market find.

The dog actually is about 61 years old. Before my parents were married they went on a date to a carnival and my dad "won" this dog as a prize. My mother named the dog "Pedro."

My dad loved to save birthday cards, sympathy cards, etc., so I placed a couple in the photo.

I used a very dark background material when I photographed the picture and then later added a textured background when I got the picture into the computer.


Challenge for Today:

Photograph some vases or pots of various heights and shapes.

Monday, July 13, 2009

Iris, Lily-of-the Valley and Peonies


THE SOFTNESS OF COLORS!

Colors can really create a mood and I believe the above is an example of "COLOR SOFTNESS" in an image.

The initial background of the above image is a see through curtain which is slightly pink in color and has a white flowered pattern.

After I got the photo into my computer, I took a background of various colors I had created and through various steps and layers, I got the above final image.


Challenge for the day:

Photograph the softness of color.

Sunday, July 12, 2009

Assorted Summer Blooms


GATHERING BLOOMS OF THE SAME COLOR

It is always neat to see hollyhock blossoms in paintings, but they really are hard to photograph!

The trouble with hollyhocks is that the stem is never fully in bloom. There may be 1 blossom and then 3 inches down or up the stem there might be another bloom. So you don't get a continuous stem in bloom. And another thing about hollyhocks is that they they tend to droop the day after you have picked them.

Anyway, now on to the above photo.

Since I had plenty of different pink flowers, I decided to have a color bouquet of pink blossoms.

I had so much trouble arranging the above flowers that once I was through photographing the flowers in one vase I just put the vase and all into an old crock and added a few more flowers. You can't really see the actual vase and I didn't have to rearrange the bouquet again.

After I got the image I wanted, I did something new. I used Paint Shop Pro's arithmetic option and then did an "average" arithmetic of 2 backgrounds I had previously worked up and then when I had 1 new background I chose another different background and did an "average" arithmetic of the new background I had just created.

I then used the final resulting arithmetic and did an arithmetic of the pink blossom image. I then adjusted the levels of brightness and pasted the image onto the original pink blossom image.

Then I adjusted the opacity to give the image enough of a "wild painting" look.

Briefly speaking the above image is the final result of using 3 different backgrounds to get 1 new background to use as a layer on the original photo.


Challenge for today:

Photograph some flowers of the same color.

Thursday, July 2, 2009

My Cat


WHAT????????

Everything about this high key image is unplanned and nothing has been added to this image to get it to look like this.

Now the first thing to this story is I had been photographing some hollyhocks and I had taken the flowers away into my kitchen to get them into cooler conditions for awhile. (My photographing room is not air conditioned.)

The second part to this story is that though I had removed the flowers/vase I had left everything else on my photography table because I planned on resuming my hollyhock photographing session later. (I was using the penny to straighten up the vase a bit.)

Unfortunately, the last key element to this image's story is that I THINK my 28-200 zoom lens has gone bad.

Anyway when I went back with my flowers to try and see what my lens would do, my cat, Abby, was sound asleep amidst my faded blossoms and penny.

I went ahead and tried out my lens with Abby instead of the hollyhocks.

In my attempts to get my lens/camera to work this is one of the images I got.

This definitely isn't a still life image or is it?

Like I said earlier there was nothing done to this image except to take out the noise in the image and remove the purple fringe which happens in digital photography.

Anyway, I've placed my 28-200 zooms lens into a different camera bag and have gotten out the cheap zoom lens which came with my camera and I'm back to taking pictures.

Now I'm trying to decide which new lens to buy or whether I should purchase a new digital camera.....decisions are generally NEVER EASY!!!!!


Challenge for today:

None....I don't want this misfortune to come your way.

Sunday, June 28, 2009

Corn Cob and Zinnias


TAKE ADVANTAGE OF WHAT IS AVAILABLE!

We had a few ears of corn given to us a couple of years ago.

I decided to try and photograph the gift.

I took two cooking pans I had purchased earlier at a thrift store. I then took a few white zinnias from my garden and placed them in a red and white teapot. I cut some corn off of the cob and I started photographing.

About the only thing I did to this image was to take out a few blemishes from the wood and softened the image a bit.


Challenge for today:

This is summer. Start photographing some vegetables or fruit!

Friday, June 26, 2009

Love those Peonies

IS LESS WILD BETTER??????

For today's image I am going to let you decide what you like.

The above image is what I call "a toned down image." If you would refer back to my posting of June 11, you would find what I term as a "wild" image. The flowers and the basic background of today's posting and the posting of June 11 are the same BUT the image of June 11 is a much wilder version of the above image.

Actually the above image has just enough of the added textured layer showing to give the image sort of a painted look. The colors and shape of the flowers and crock are completely in view. However, the shape and colors of the crock and flowers in the June 11 image are NOT nearly as identifiable as they are in today's image.

I'm not saying these images are "art".........and yet, people DO have a preference in what they like in art. And the good thing about photography and computers is that you have more of a chance to please the various tastes of viewers.


Challenge for today:

Try and turn a basic image into 2 images to please to two spectrums of viewers.

Thursday, June 25, 2009

Summer Bouquet


USING WHITE POSTER BOARD AS A BACKGROUND

It really does help to know WHAT your plans are with an image AFTER you photograph it so you know how to set up the image.

I wanted an image that had some empty space for text.

So I photographed a clear vase/flowers against white poster board.

After I uploaded the image into the computer I chose a textured background and made it to be a layer. I then adjusted the layer's opacity so it added just enough color to make the total image interesting. But I didn't want the added texture/color to overpower the flowers and the text I would later add.


Challenge for the day:

Start a collection of colored poster boards - but start out with white.

Thursday, June 18, 2009

Bowl of Oatmeal and Raspberries


EXPLORATION IN PHOTOGRAPHY!

This day and age of digital photography it is much easier to really let the "inner you" come out. One of the main reasons for that is you don't have the film and processing costs to contend with anymore. Of course you may be one of those many individuals who have digital images converted over at Wal-Mart and actually printed out as pictures - BUT at least you have the option.

When you don't have to conserve on the actual costs of your photo taking session, then you are really free to explore the creative composition of your still life pictures.

A lot of times I find myself working around a theme in photos until I've grown tired of a particular type of images.

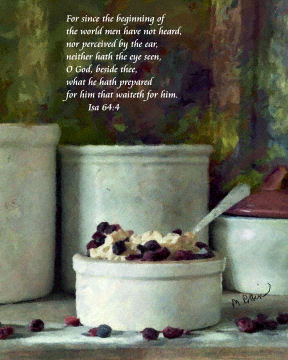
The above image was one of the results of a series I did with old crocks and food.

This image was done using an old dresser, old wood, old crocks, and fresh food.

I placed an old board down for the surface and placed some old boards against the dresser's mirror and used those old boards for the backdrop.

I arranged the old crocks and got out a newer bowl which had a cranberry colored lid. If you notice that cranberry lid goes well with the raspberries - especially that little one to the left the oatmeal bowl.

I actually did make up a bowl of oatmeal and then I got some frozen raspberries out of the freezer.

After I scattered some sugar and some raspberries on the old board, I was ready to start clicking away.

After I chose an image I liked and got it uploaded into the computer, I chose a background I had created made out of just colors and placed it as a layer onto the image I had just taken.

I then worked with the "color layer" and with the original image for awhile until I got just the right look - the wood used as the backdrop has a lot of the "color layer" and the rest of the image has a lot less of the "color layer."


Challenge for today:

Go ahead and photograph some food!

Wednesday, June 17, 2009

In Remembrance


TO HELP EASE THE PAIN

When my father died at the age of 93, I decided to photograph some of the plants that were given in honor of him and use them as "thank you" cards.

You don't need to tell me that that type of thing sounds like a terrible thing to do. Yet, it really did help me in my grief by making something pretty out of the plants and it also occupied my time.

The above image was sent by a few of my dear co-workers.

I photographed the plant with some red books. (I thought the red in the flower would look prettier if the books were of the same color.)

The background was a very light colored blank wall. The wood behind the plant was an open door.

I placed one of my created backgrounds as a layer over the photograph and then I erased everything on the layer except I did allow the background to replace the blank wall.

The final image result looks like the plant is in front of a view of the sky.

And this is an image in memory of my father and the kindness of my friend's in my sorrow.


Challenge for today:

Remember that Father's Day is coming up. Photograph something that has happy memories that belongs in his past.

Thursday, June 11, 2009

Wild Peonies


HAVE MORE THAN ONE VERSION OF AN IMAGE!

This image IS different from yesterday's peonies, but I did use the same crock and the same window curtain as the background.

Peonies seem to demand to be shown as being delicate even if they are in a dark setting. So I worked up the image of these peonies in a delicate image by using Paint Shop Pro's arithmetic effect.

BUT....BUT....BUT....the above image is AFTER I used the arithmetic effect and after I darkened the arithmetic effect but BEFORE I did anything else and definitely before I started toning the image down.

Again let me explain what "arithmetic" means. In Paint Shop Pro you take 2 images of the same size. (I used the peonies image and then an image which was composed of strokes which were made up of random colors - done in Microsoft Photodraw.) Then in Paint Shop Pro you have a choice of 3 different arithmetic options: 1. an average of the 2 images, 2. the darkest of the 2 images, or 3. the lightest of the 2 images. (Actually there are other options, but I don't understand them.)

For the above image I did an average of the 2 images - this is the option I generally use.

Of course after I do the first arithmetic effect and the first initial darkening procedure I then start toning down the arithmetic effect. It just seems to me that the darkening of the arithmetic effect ends up helping the overall final result.

If you find yourself using the arithmetic effect in Paint Shop Pro you will find the first arithmetic version really comes out looking more like a wild painting (especially if you darken it).


Challenge for today:

Download a free trial version of Corel Paint Shop Pro .

Wednesday, June 10, 2009

Peonies in a Crock


NOTHING LIKE AN ABUNDANCE!

One of the neat things about peonies is that they have such large blossoms! It doesn't take too many to make you feel like you have a lot and when you actually have a lot......

I didn't plant these peonies, but I'm glad someone did. I do like white peonies; however, the pale pink peonies have such a delicate look about them.

In composing this picture, I used as the material a see through curtain I bought as some thrift store.

Since I wanted to make sure that the light colored peonies wouldn't fade in the background, I used the darker colored peonies and the sage(?) to help break the curtains from the rest of the flowers.

After I chose a picture I liked and got it uploaded into the computer, I made a layer out of another image I had worked on and pasted it on the peonies image. Then I worked with the layer and peonies photo a while.

When I finally got the right combination of layer and peonies, I printed the result out and admired it for awhile!


Challenge for today:

Go to a thrift store and look for some good cheap curtains you can later use.

Monday, June 8, 2009

Catalpa Tree Blossoms


USING WHAT YOU HAVE!

I will keep on stressing the importance on using what you already have.

First off - when was the last time you saw an image of roses? Yesterday or just a couple of hours ago?

Why not start photographing items or flowers which most people overlook? Why not photograph some flowers/weeds that most people don't think are "worthy" of being photographed?

I chose the above catalpa tree blossoms because who else would. But in defense of the subject matter - the catalpa leaves are really big and the blossoms aren't too small.

I chose the clear round thrift store bowl because I thought it would be pretty.

My husband had a small old brown stained table. I sat the bowl of blossoms down upon the table.

I then brought out some large brown material to use as the background. With the table and the background being brown I thought it would make the shades of green in the leaves to really show up. To really make the blossoms show up I made sure that some of them were right in front of the dark brown background.

And that was the image - no special computer additions - just an image of some "plain catalpa leaves and blossoms."


Challenge for the day:

Photograph what is generally overlooked.

Saturday, June 6, 2009

Tea and Tea Roses


DO MORE WITH SWEATERS THAN WEAR THEM!

I have this sweater which is a really deep bluish/lavender color and has a lot of different raised color speckles on it.

For this particular photography hour I had 3 tea roses, a few grapes and some Coke to work with.

One of the important things in setting up still life photography is to try and make an image seem real and inviting. And it is hard to set up an image when you have limited props for it is ALWAYS better to have too many roses, too many grapes, etc.

And that really was the challenge here.

(Oh, I forgot....a different kind of challenge was because I was working with a sweater. The sweater is only about waist long and of course has sleeves. This all creates a limitation on how much material you have to use with the props.)

So with these different challenges, I finally got an image I like.

After I got it uploaded into the computer, I then added a layer which adds painting like textures. I then worked with the layer and the image until I got what I wanted. I then deepened the color to more of a blue because that seemed to go better with the yellow.


Challenge for today:

Though it is almost summer, get out those sweaters and photograph them with flowers.

Thursday, June 4, 2009

Playing with Patterns


SOMETIMES YOU HAVE
TO KNOW WHEN TO START
OVER!

I purchased the vase used in these 2 pictures because
I thought it had an interesting
pattern.

I also purchase a large roll of wallpaper which was on sale.

On two separate days about 3 weeks later I decided play with the vase and the wallpaper.

The image on the top is one
of the photographs I took
on the first day.

The image on the bottom is an image I took on the second day. And by the way, the background for the top photograph was a short brown winter jacket which belonged to my father. The jacket's brown corduroy material added an interesting texture to the photo - almost like the texture of wood.


Now that I have the 2 images posted, perhaps I should just start over and NEVER USE THE VASE AND THE WALLPAPER TOGETHER!!!!!


Challenge for today:

Experiment with patterns.

Wednesday, June 3, 2009

Depression Glass

REMEMBER THE DETAILS OF YOUR PROPS

Do you what to know what I see when I look at this image?

I see fake roses matching a flower bowel.

I also remember that the bowl was purchased at an antique shop very cheaply because there is a slight crack in the bottom which prevents it from holding any kind of liquid.

I see a teacup which really has Coke in it because I was as in a hurry to start photographing as usual and I didn't want to wait for the tea or coffee to brew.

And what I finally see is a tea bag which has a perfectly straight string.

(I remember from a long time back how I was raked over the coals by a really wise and famous photographer for having an EMPTY TEACUP in an image. Then I was rebuked for having a crook in the tea bag string - it detracted from the overall image.)

By now you must be thinking, "Why tell me all about this?"

Well, for reason number 1: you don't have to throw away an object like the bowl. Fresh flowers CAN live a short period of time without water....but you DO have to remember that there is a crack. Anyway, I purchased this bowl because I like the cut design on the glass. If there were flowers in the bowl, you wouldn't see the design.

Then for reason number 2: you really can use fake flowers if you position them wisely.

Now for reason number 3: follow through with what should be logical. A teacup is meant to have something in it and if you want it to be tea then a tea bag follows through with the overall idea of tea.

And by the way - look at the image for May 26 - but there may not be a tea bag in that image.


Challenge for the day:

Do some remembering.

Tuesday, June 2, 2009

Fresh Eggs and Old Crockery


IT ALL STARTED WITH SOME GREEN EGGS!

I'm still not used to having fresh eggs. And having fresh GREEN EGGS!!!!!! I just had to photograph the eggs.

So, I had some eggs.....what do I do to make an image using the eggs look at least believable? That is what I have said before, "I haven't seen any books on how to compose still life photos."

In my quest to make the scene likely, I decided to try and make what would seem to be an old fashioned setting.

I got out some old crockery, I placed some cocoa in a bowl, I got some chopped up walnuts from out of the freezer and placed them in an old nut chopper, placed a couple of old walnuts around, put a few chopped up nuts on the board I was using, scattered some sugar on the board, broke one egg, and then I was all set to photograph.

I think that the photograph does look realistic.

After I got the image I wanted, I went to my computer and added a layer to give it a painting look. I worked with the layer awhile and finally got what I wanted. I was done.


Challenge for today:

Try and photograph some food.

Sunday, May 31, 2009

Completely Spring


THERE'S SOMETHING ABOUT SPRING FLOWERS!

Whether you have spring flowers or tree blossoms, there is a certain magic about getting out the camera and photographing something other than snow scenes.

For this image I just picked a bunch of spring blossoms and placed them in a clear jar.

I used a white blanket for the background and after I chose this image, I put the image in the computer and started working on it.

I had a background which had a lot of blue, yellow and a tinge of lavender. Since I wanted the final image to appear a little wild and yet, not too wild - I did quite a bit of manipulation. I did an arithmetic effect using PaintShop Pro and then I did a lot of layering and erasing.

All this is clear as mud....right? I thought so.

Well, anyway....the result is that the background is wilder looking than the flowers and the vase and yet, the flowers and vase still look like they have been painted.

I finally got the result I wanted.


Challenge for today:

Keep in mind what kind of spring flowers you'll want to photograph next year and plan on planting some of them this fall.

Friday, May 29, 2009

Tiger Lilies and Butterflies


BE CAREFUL WITH YOUR BACKGROUND MATERIAL

The particular background material I used in this image has been packed away. I come across it now and then but I'll have to think hard before I use it again. As a sheet, the butterflies and flowers are really pretty, but the butterflies and flowers do make the image busy. Yet, I do like the image.

After I settled for this photo and got it into the computer, I decided to try and diminish the busyness in the background. And guess what I used to try and diminish the overpowering background? I got out one of my created backgrounds and made it as a layer on the photograph. By adjusting the opacity of the layer just right, I was able to kinda tone down the butterflies and flowers on the sheet.

Now when I look at the image I primarily see a LOT of lilies and a lot of color!

Oh, by the way, since I was using a clear vase I made sure that the "water line" in the vase was near the top and wasn't way down in the middle of the vase.


Challenge for today:

Use a sheet for the background of some photograph.

Thursday, May 28, 2009

Peonies


USING DARK AND LIGHT

Sometimes the vase and flower helps to decide if the photo should be dramatic or kinda fun.

When I picked the peonies and looked around for a vase I decided to use a gold colored one. Then I decided to make the photo dramatic. With this in mind I used a very dark gray cloth to use as the backdrop. I took off the light colored cloth I had on the table top...and I was all set.

I took a lot of different photos - some with books - some without the books. Though there were a few I really did like, I decided to work on this one.

Once I got the image into the computer I placed a background layer which I had created earlier on top of the image. Then I adjusted the opacity until just a little bit of the background layer was showing. I DID NOT WANT the background layer to overpower the already dramatic look for the image!


Challenge for today:

Plant some flowers today that you can photograph later this year. It still isn't too late!

Wednesday, May 27, 2009

Spring Blossoms

GETTING A FEEL OF ABUNDANCE ISN'T EASY!

It really is hard to get enough blossoms and such into an image to give a feeling of abundance! (That is why I am really trying to get a lot of flowers planted which will bloom from summer till fall.)

Anyway, I had a few late blooming daffodils but not a whole lot....thank goodness I had a lot of tree and shrub blossoms.

I generally like one color vases, but I fell in love with the above tin. I guess I liked the yellow gold and green color combination. (What I don't like about the tin is that it has a handle on each side. Almost every time I photograph this vase I try to hide the handles, but sometimes it just isn't possible.)

Now back to the image. I photographed it against a white background. Then when I got it into the computer I created a layer out of a background I had previously created. I chose enough of a opacity of the layer so you could SEE the layer, but still the flowers and vase are the main objects in the image - NOT THE BACKGROUND LAYER.


Challenge for today:

Look around for some unusual colored vases.

Tuesday, May 26, 2009

Tea Roses?


WHAT DO YOU DO WHEN YOU DON'T HAVE FRESH FLOWERS?

Well you could dig around in your collection of fake flowers, if you have one. If you don't, I would highly suggest that you get at least a small collection.

There are many stores which carry artificial flowers and of course, there are the thrift stores. Also Hobby Lobby sometimes offers really good prices for their wide selection of flowers. Of course there are many flowers which are highly expensive - but you can use them over and over and you really don't have to go the expensive route.

The above image was taken to help me beat the winter blues and to help calm my soul. My father was exhibiting signs of a type of dementia which made it necessary that someone always was home with him. And photography was an easy outlet to help my mind escape even though I was at home as a care giver.

I had purchased some depression glass at a local antique store and since the above pieces actually did pretty well in matching in color, I decided to photograph them with some fake roses which kinda went with the color scheme.

I place everything on white material so I could easily work with the image after I got it into the computer.

After I chose the above layout and got it into the computer, I found a background I had earlier worked up and made it a layer. I then worked with the image and the layer and finally got that "I can live with this" result. I then went into Photoshop Elements 3 and used a special effect to get the above final result.


Challenge which is ongoing:

Keep in mind to be at least somewhat on the lookout for good buys on artificial flowers.

Monday, May 25, 2009

Wedding Dress and White Roses


WELL HERE IT IS - THE PROMISED IMAGE

The past couple of weeks I've posted images I did while playing around with some curtains with white roses on them, real white roses, and a white crock.

During the month of May in 2002 I did the above image and decided that was the one I liked the most.

Then because my boyfriend loved roses, I used the above image as a birthday card for him.

Then on Memorial Day we got engaged!

In the background you can see some material which is wrapped behind and beside the crock of flowers. That is a used wedding dress which was given me in the early 90's. And I used that as MY wedding dress.

I know it is fairly common for people to print out their own wedding invitations. So, I worked on the image quite a bit and printed out my own invitations. However, MY wedding invitation had my own wedding dress on it!


Challenge for today:

If you have anything which pertains to a wedding, try photographing it.

Sunday, May 24, 2009

Blue, Orange and Green


TAKE ADVANTAGE OF FRUIT, FLOWERS, BOWELS, AND COLORS

As far as I know there are NO instructional books written on the placement of items in a still life image. Everything is by trial, error, experiments, and just keeping at it.

I thought the above colors would go well together.

It was the "how do I place everything together" which was hard. So I just took a whole lot of different arrangements and settled on this one. It just "felt" right.

There was no smudging done to this image. But I did soften it a little.


Challenge for today:

Try and do an image combining fruit and flowers or vegetables and flowers or a combination of them all.

Tuesday, May 19, 2009

City Garden


TAKE ADVANTAGE OF A FRIEND'S GARDEN!

When you are in a garden there isn't much you can do to PLAN a photo. All you can really do is try and control the lighting and try not to get anything in the image that doesn't belong there.

I have a friend who has a wonderful garden and this was just a wonderful setting!

With the daisies in the foreground and the foxglove in the background (I think) this is a delicate photo shoot.

I don't know why I did a special photo treatment with this image, but I did. By using Microsoft's PhotoDraw I did an antique look.

All in all, I am satisfied with the gentleness of the photo.


Challenge for today:

Ask your friends if they have flowers they want photographed.

Sunday, May 17, 2009

Magnolia Blossoms


JUST A COUPLE OF SIMPLE BLOSSOMS!

I love magnolia blossoms. I think they are one of the prettiest tree blossoms around. But I don't have a magnolia tree and unfortunately they are one of the first blossoms to get hit hard by the freezing weather.

A friend of mine from work DID have a tree and I went over and gathered up just a few blooms.

When I got home I placed the blooms on a gold colored serving dish which really works well when I want something to have a reflection - like the above blooms.

The only changes in this image is I made the photo darker and took out my favorite smudge tool to make it more like a painting.


Challenge for today:

Find something that you can place objects on that would work well in showing reflections.

Saturday, May 16, 2009

White Roses and Jewelry


PLAY AROUND WITH INEXPENSIVE JEWELRY!

I got the idea of mixing the roses and the jewelry as I was photographing the roses in the little gold colored vase (or whatever you want to call it).

And since I had the fake pearl necklace and the barrette was also made out of fake pearls.......

Well anyway, I thought the white of it all would look well with the white roses.

I actually used as the background for this picture some dark brown material which has a slight pattern on it. The material is very wide and long - probably about the same size of a twin sized bedspread.

Over a period of several days, I took many different poses of this image. Then what normally doesn't happen did. I had a hard time choosing which image to use. But I finally settled on the above photo.

After I got the image into my computer, I took a very dark background I had created and placed it as a layer on the image. I adjusted the opacity so just a slight amount of the added layer was showing.


Challenge for today:

Why not go to a thrift store and shop around for some inexpensive jewelry you could photograph.

Friday, May 15, 2009

What a Memory of Roses


WHY NOT PHOTOGRAPH YOUR PHOTOGRAPH?

A good way to make a memory a "good memory" is to photograph it.

The above image has many elements.

To start off - my husband gave me some roses.

I took many different pictures of the roses and settled on one image I liked.

I then added to the image a background that I had created and made some adjustments on the opacity of the background layer.

I then did some smudging to the image.

I then printed the image out to 11 x 14 in size. I then placed the printed out image into the frame.

The roses in the foreground were the actual roses in the "framed painting." Of course the roses were 1 or 2 days older. I can't remember how long it took me to get the picture ready to photographed in the frame.

The hardest thing about this image AFTER it was framed was getting the actual frame to be straight so I could photograph it! You can't imagine how hard it was and how many pictures I took before I settled on this one.


Challenge for today:

Keep on thinking about photographing a photograph!